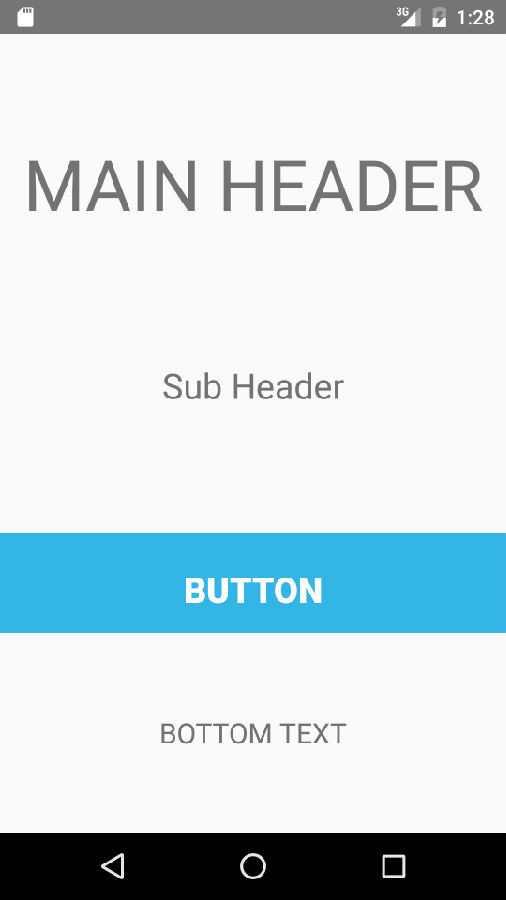
在大多数的Android应用的开发中,我们主要使用三种类型的布局 inearLayout,RelativeLayout和FrameLayout。在创建某些复杂的布局时,我们需要使用weight属性来分配视图比例。但在使用weight属性时,我们要添加一个默认的容器视图来封装我们的子视图。这种方法的问题是它增加了一个额外的视图层次布局,除去为了使用weight属性的原因,这层布局则是完全多余的一种存在。 inearLayout,RelativeLayout和FrameLayout。在创建某些复杂的布局时,我们需要使用weight属性来分配视图比例。但在使用weight属性时,我们要添加一个默认的容器视图来封装我们的子视图。这种方法的问题是它增加了一个额外的视图层次布局,除去为了使用weight属性的原因,这层布局则是完全多余的一种存在。 Android在新的support包中引入了一种新的布局叫做PercentRelativeLayout,我们可以认为它把RelativeLayout和weight属性结合了起来。PercentRelativeLayout继承于RelativeLayout,但是它新添加了一个percentage特点。我们可以对它其中包含的视图组件的一些属性相对于父布局来设置百分比,例如宽度,高度,以及外边距等。使用PercentRelativeLayout我们可以更好更方便的对不同分辨率设备进行适配,同时可以减少布局的复杂度。 为了使用PercentRelativeLayout,我们需要在项目的build.gradle文件中添加如下依赖: compile 'com.android.support:percent:25.3.0' 下面一个小例子演示了如何使用该新控件,以及和使用LinearLayout下的布局层次差异。首先我们使用LinearLayout来布局: <?xml version="1.0" encoding="utf-8"?> <LinearLayout xmlns:android="http://schemas.android.com/apk/res/android" android:layout_width="match_parent" android:layout_height="match_parent" android rientation="vertical" rientation="vertical" android:weightSum="4"> <LinearLayout android:layout_width="match_parent" android:layout_height="0dp" android:layout_weight="1.5" android:gravity="center"> <TextView android:layout_width="wrap_content" android:layout_height="wrap_content" android:text="MAIN HEADER" android:textSize="50dp" /> </LinearLayout> <LinearLayout android:layout_width="match_parent" android:layout_height="0dp" android:layout_weight="1" androidrientation="vertical"> <TextView android:id="@+id/textview_sub_header" android:layout_width="match_parent" android:layout_height="wrap_content" android:layout_marginTop="20dp" android:gravity="center" android:text="Sub Header" android:textSize="25dp" /> </LinearLayout> <LinearLayout android:layout_width="match_parent" android:layout_height="0dp" android:layout_weight="0.5" androidrientation="horizontal"> <Button android:id="@+id/button" android:layout_width="match_parent" android:layout_height="80dp" android:background="@android:color/holo_blue_light" android:text="Button" android:textColor="@android:color/white" android:textSize="25dp" android:textStyle="bold" /> </LinearLayout> <TextView android:id="@+id/textview_bottom_text" android:layout_width="match_parent" android:layout_height="0dp" android:layout_weight="1.0" android:gravity="center" android:text="BOTTOM TEXT" android:textSize="20dp" /> </LinearLayout>
我们再使用PercentRelativeLayout来搭建相同的布局:
<android.support.percent.PercentRelativeLayout xmlns:android="http://schemas.android.com/apk/res/android" xmlns:app="http://schemas.android.com/apk/res-auto" android:layout_width="match_parent" android:layout_height="match_parent"> <TextView android:id="@+id/textview_title" android:layout_centerHorizontal="true" android:gravity="center" android:text="MAIN HEADER" android:textSize="50dp" app:layout_heightPercent="10%" app:layout_marginTopPercent="14%" app:layout_widthPercent="100%" /> <TextView android:id="@+id/textview_sub_header" android:layout_height="wrap_content" android:layout_below="@+id/textview_title" android:gravity="center" android:text="Sub Header" android:textSize="25dp" app:layout_marginTopPercent="17%" app:layout_widthPercent="100%" /> <Button android:id="@+id/button_blogger" android:layout_below="@+id/textview_sub_header" android:background="@android:color/holo_blue_light" android:text="button" android:textColor="@android:color/white" android:textSize="25dp" android:textStyle="bold" app:layout_heightPercent="13%" app:layout_marginTopPercent="16%" app:layout_widthPercent="100%" /> <TextView android:id="@+id/textview_bottom_text" android:layout_height="match_parent" android:layout_below="@+id/button_blogger" android:gravity="center" android:text="BOTTOM TEXT" android:textSize="20dp" app:layout_widthPercent="100%" /> </android.support.percent.PercentRelativeLayout>
编译运行,左右两图分别为通过LinearLayout和PercentRelativeLayout搭建的界面,可以看到界面展示效果一致:

我们再使用Android布局查看工具view hierarchy,如下两图分别为通过LinearLayout和PercentRelativeLayout搭建的布局情况,发现使用PercentRelativeLayout后我们成功减少了一个布局层次: 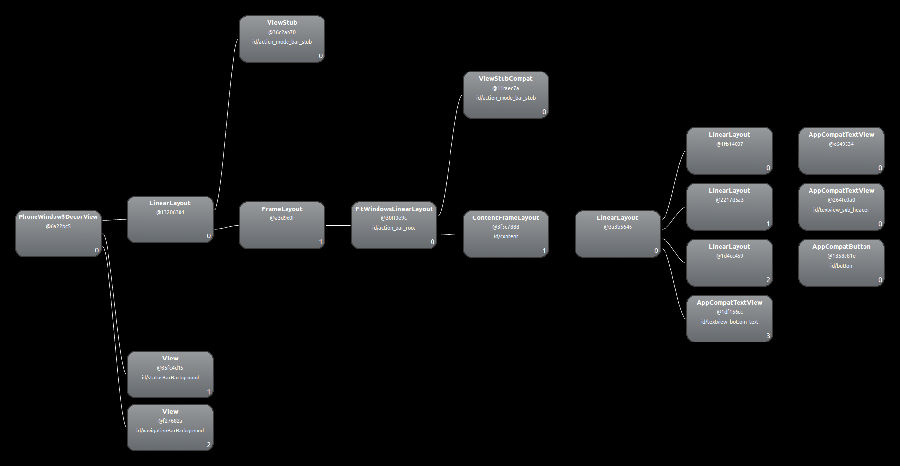
| 

 IP卡
IP卡 狗仔卡
狗仔卡 发表于 2019-11-5 16:06:39
 提升卡
提升卡 沉默卡
沉默卡 喧嚣卡
喧嚣卡 变色卡
变色卡 抢沙发
抢沙发 千斤顶
千斤顶 显身卡
显身卡